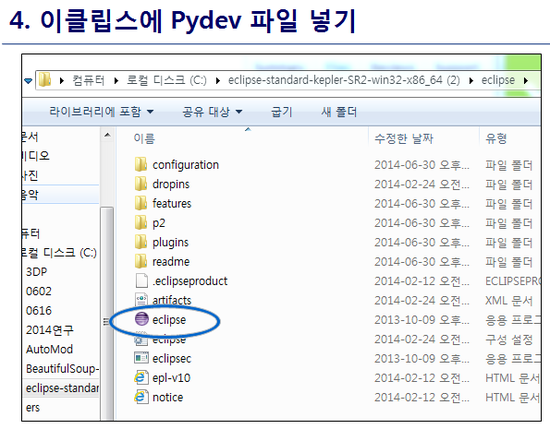
ensym() 에러

프로그래밍/R 2024. 4. 15. 15:40


위의 이미지와 같은 에러가 날 경우, 아래와 같은 코드를 썼을 때

plt <- ggbetweenstats(
			data = data,
			x = data$Class,
   			y = data$halftime
)


아래와 같이 수정

plt <- ggbetweenstats(
		   	data = new_data,
   			x = Class,
   			y = halftime
)

'프로그래밍 > R' 카테고리의 다른 글

R script를 리눅스 콘솔 창에서 바로 실행  (0) 2014.01.07
factor to numeric & factor to integer  (0) 2012.05.16
Posted by halloRa
,

출처: https://stackoverflow.com/questions/8629330/unix-count-of-columns-in-file


unix - count of columns in file

Given a file with data like this (i.e. stores.dat file) sid|storeNo|latitude|longitude 2|1|-28.03720000|153.42921670 9|2|-33.85090000|151.03274200 What would be a command to output the number of ...

stackoverflow.com

column 사이즈 상관없이 파일 내의 column 갯수를 알고자 할 때,


$ head -1 [파일명] | tr '[구분자]' '\n' | wc -l

Posted by halloRa
,

최신 버전 활용


1. Python 3.8 설치

출처: https://codechacha.com/ko/install-python37-in-ubuntu1804/


> wget www.python.org/ftp/python/3.8.2/Python-3.8.2.tgz

> tar -zxvf Python-3.8.2.tgz

> cd Python-3.8.2

> ./configure

> make

> sudo make install


Python 2/3 을 혼용으로 쓰고 싶을 때 Alternative 활용!

출처: https://codechacha.com/ko/change-python-version/


> sudo update-alternatives --config python

결과: update-alternatives: error: no alternatives for python

> sudo update-alternatives --install /usr/bin/python python /usr/bin/python2.7 1

> sudo update-alternatives --install /usr/bin/python python /usr/local/bin/python3.8 2

> sudo update-alternatives --config python

결과: There are 2 choices for the alternative python (providing /usr/bin/python).

Selection Path Priority Status

------------------------------------------------------------

* 0 /usr/bin/python3.6 2 auto mode

1 /usr/bin/python2.7 1 manual mode

2 /usr/bin/python3.6 2 manual mode


2. boost 1.73 설치 with Python3 

출처: https://gist.github.com/melvincabatuan/a5a4a10b15ef31a5a481


1. Check Python3 root

>>> import sys

>>> import os

>>> sys.executable '/usr/local/bin/python3'

OR $ which python3 /usr/local/bin/python3


2. Modify user-config.jam

Ex. location:

/boost_1_57_0/tools/build/example/user-config.jam

Ex. modification

using python : 3.4 : /usr/local/bin/python3 : /usr/local/include/python3.4m : /usr/local/lib ;


4. sudo ./bootstrap.sh --with-python=/usr/local/bin/python3 --with-python-version=3.8 --with-python-root=/usr/local/include/python3.8

Ex.

Building Boost.Build engine with toolset gcc... tools/build/src/engine/bin.linuxx86/b2 Unicode/ICU support for Boost.Regex?... /usr Backing up existing Boost.Build configuration in project-config.jam.3 Generating Boost.Build configuration in project-config.jam... Bootstrapping is done. To build, run: ./b2 To adjust configuration, edit 'project-config.jam'. Further information: - Command line help: ./b2 --help - Getting started guide: http://www.boost.org/more/getting_started/unix-variants.html - Boost.Build documentation: http://www.boost.org/boost-build2/doc/html/index.html


5. sudo ./b2 --enable-unicode=ucs4 install (<- 반드시 이렇게 설치할 것)

$ sudo ./b2 --enable-unicode=ucs4 install

sudo: unable to resolve host cobalt [sudo] password for cobalt: Performing configuration checks - 32-bit : yes (cached) - arm : no (cached) - mips1 : no (cached) - power : no (cached) - sparc : no (cached) - x86 : yes (cached) - lockfree boost::atomic_flag : yes (cached) - has_icu builds : yes (cached) warning: Graph library does not contain MPI-based parallel components. note: to enable them, add "using mpi ;" to your user-config.jam - zlib : yes (cached) - iconv (libc) : yes (cached) - icu : yes (cached) - compiler-supports-ssse3 : yes (cached) - compiler-supports-avx2 : yes (cached) - gcc visibility : yes (cached) - long double support : yes (cached) warning: skipping optional Message Passing Interface (MPI) library. note: to enable MPI support, add "using mpi ;" to user-config.jam. note: to suppress this message, pass "--without-mpi" to bjam. note: otherwise, you can safely ignore this message. - zlib : yes (cached) Component configuration: - atomic : building - chrono : building - container : building - context : building - coroutine : building - date_time : building - exception : building - filesystem : building - graph : building - graph_parallel : building - iostreams : building - locale : building - log : building - math : building - mpi : building - program_options : building - python : building - random : building - regex : building - serialization : building - signals : building - system : building - test : building - thread : building - timer : building - wave : building ...patience... ...patience... ...patience... ...patience... ...patience... ...patience... ...found 35166 targets... ...updating 6 targets... gcc.link.dll bin.v2/libs/python/build/gcc-4.8/release/threading-multi/libboost_python3.so.1.57.0 common.copy /usr/local/lib/libboost_python3.so.1.57.0 ln-UNIX /usr/local/lib/libboost_python3.so gcc.archive bin.v2/libs/python/build/gcc-4.8/release/link-static/threading-multi/libboost_python3.a common.copy /usr/local/lib/libboost_python3.a ...updated 6 targets...


3. cmake 3.17.2 설치

출처: https://tttsss77.tistory.com/77


> wget https://cmake.org/files/v3.17/cmake-3.17.2.tar.gz

> tar -zxvf cmake-3.17.2.tar.gz

> cd cmake-3.17.2/

> ./bootstrap

> make

> sudo make install


install and use eigen3 on ubuntu 16.04

출처: https://kezunlin.me/post/d97b21ee/

> sudo apt-get install libeigen3-dev


4. RDKit 2020.03.2 설치

출처: https://www.rdkit.org/docs/Install.html#


Download from github.com/rdkit/rdkit/archive/Release_2020_03_2.tar.gz

> tar -zxvf Release_2020_03_2.tar.gz

> cd rdkit-Release_2020_03_2

> vi ~/.bahrc

추가:

export RDBASE=/mnt/hdd0/SKBP/lib/RDKit/rdkit-Release_2020_03_2

export LD_LIBRARY_PATH=${LD_LIBRARY_PATH}:${RDBASE}/lib:/usr/lib/x86_64-linux-gnu

export PYTHONPATH=${PYTHONPATH}:${RDBASE}

> cd $RDBASE

> mkdir build

> cd build

> cmake -D Boost_NO_BOOST_CMAKE=ON -D BOOST_ROOT=/mnt/hdd0/SKBP/lib/Boost/boost_1_73_0 -D PYTHON_LIBRARY=/usr/local/lib/python3.8/config-3.8-x86_64-linux-gnu/libpython3.8.a -D PYTHON_INCLUDE_DIR=/usr/local/include/python3.8/ -D PYTHON_EXECUTABLE=/usr/local/bin/python3 ..

> make

> sudo make install

Posted by halloRa
,

출처: http://blog.naver.com/6748000/220045895756


먼저 파이썬 홈페이지에 가서 파이썬을 다운받는다

https://www.python.org/downloads/


다운받으면 시작창에서 확인하고 IDLE 클릭!


간단한 코드로 실행이 제대로 되는지 확인


그다음은 이클립스 설치. 역시 이클립스 홈페이지에 가서 제품을 다운받는다

(standard 혹은 classic)


http://eclipse.org/downloads/


다운받은 알집을 압축해제 한다.


그다음은 이클립에서 파이썬을 사용하기 위해 Pydev 를 다운 받는다

버전은 그냥 최신버전 아무거나

http://sourceforge.net/projects/pydev/files/


Pydev 도 압축을 풀면 두개의 폴더가 있는데 이것을 복사해서 이클립스 폴더에 붙여넣기 한다.


붙여넣겠다고 하면 합치겠냐고 묻는데 "예"를 선택


Pydev 파일까지 넣었으면 이클립스 실행!!


이클립스와 파이썬을 연동하기 위해 Window ->Preferences 클릭!!


클릭하면 위와같은 창이 나오는데 왼쪽부분에서 Pydev->Interpreters->Python Interpreters를 클릭한다음 나타나는 창에서 New 클릭


New를 클릭하면 나타나는 창에서 브라우져를 클릭하고 파이썬 폴더로 가서 Python 파일 선택!


그냥 오키!


오케이!!


잘 연동이 되었는가 확인하기 위해서 프로젝트 하나 만들어서 test하기


이름은 머 아무거나 하고


프로젝트 생성했으면 왼쪽에 네모모여있는것들 클릭해서 프로젝트 창 확인


생성한 프로젝트에서 우클릭하면 모듈 생성가능.

이것도 이름 아무거나


모듈생성 되었으면 위와 같이 파이썬 코드 편집할 수 있도록 뜬다


코드를 적고 run!!!!!


-------------------------------------------------------------------------------------------------------------------


실제 new install software를 통해 plugin 형태로 설치하려 하였으나

대부분의 사이트에서 말하는 http://pydev.org/updates  사이트가 제대로 작동 안됨.

따라서 위의 방식으로 설치가 필요함

Posted by halloRa
,

form 으로 데이터 전송 시 input type text의 데이터가 disabled 되어 있으면

다른 페이지로 데이터가 전송이 안된다.


따라서 이를 전송 가능하게 만들면서도 사용자가 만질 수 없도록 하려면

readOnly 로 만들고 

style background 값을 #EBEBE4 로 설정하면 

disabled와 같이 보이면서도 데이터 값을 form으로 전송 가능!

Posted by halloRa
,

검색해보니

form으로 데이터 전송 시 넘어가는 데이터들은 모두 input type의 데이터들만 가능!!

따라서 넘겨주고 싶은 데이터들은 input type을 이용하여 값을 할당 해놓을 것

Posted by halloRa
,

Vecscreen

Bioinformatics/New Tech 2014. 3. 13. 09:50

출처: http://www.ncbi.nlm.nih.gov/tools/vecscreen/about/


About VecScreen

VecScreen is a system that quickly finds segments of a nucleic acid sequence that may be of vector origin. It helps researchers identify and remove any segments of vector origin before they analyze or submit sequences. Researchers are encouraged to screen their sequences for vector contamination using the form on the VecScreen search page.

Failure to recognize foreign segments in a sequence can:

  • lead to erroneous conclusions about the biological significance of the sequence
  • waste time and effort in analysis of contaminated sequence
  • delay the release of the sequence in a public database
  • pollute public databases with contaminated sequence

GenBank Annotation Staff use VecScreen to verify that sequences submitted for inclusion in the database are free of vector contamination

VecScreen searches a query sequence for segments that match any sequence in UniVec, a specialized non-redundant vector database. The search uses BLAST with parameters preset for optimal detection of vector contamination. Those segments of the query that match vector sequences are categorized according to the strength of the match, and their locations are displayed (see an example of a positive result).

Although a VecScreen search against UniVec will not identify the vector that is the most likely source of the contamination (see UniVec Limitations), this can usually be deduced from the cloning history of the sequenced DNA (see Identifying the Foreign Sequence for more details).

Guidance on how to interpret positive VecScreen results and also on how to remove the foreign segment(s) from a contaminated sequence is available in Interpretation of VecScreen Results.

VecScreen Search Parameters

The sequence of any vector contamination should theoretically be identical to the known sequence of the vector. In practice, occasional differences are expected to arise from sequencing errors, and less frequently, from engineered variants or spontaneous mutations. The search parameters used for VecScreen have, therefore, been chosen to find sequence segments that are identical to known vector sequences or which deviate only slightly from the known sequence.

The blastn parameters used for VecScreen are significantly more stringent than the default blastn parameters. The principal differences are:

  • Increased penalty for mismatches
    • This severely limits the frequency of mismatches in alignments.
  • Gap penalties more tolerant of single base insertions or deletions
    • This accommodates the type of sequencing error that adds or omits a base.
  • Low complexity filtering only for initial hits
    • This prevents an alignment from being initiated in a low complexity region while allowing alignments that extend across regions of low complexity to be scored appropriately.

The VecScreen parameters are pre-set using blastn options-q -5 -G 3 -E 3 -F "m D" -e 700 -Y 1.75e12

VecScreen Match Categories

Vector contamination usually occurs at the beginning or end of a sequence; therefore, different criteria are applied for terminal and internal matches. VecScreen considers a match to be terminal if it starts within 25 bases of the beginning of the query sequence or stops within 25 bases of the end of the sequence. Matches are categorized according to the expected frequency of an alignment with the same score occurring between random sequences.

Strong Match to Vector
(Expect 1 random match in 1,000,000 queries of length 350 kb.)
Terminal match with Score ≥ 24.
Internal match with Score ≥ 30.
Moderate Match to Vector
(Expect 1 random match in 1,000 queries of length 350 kb.)
Terminal match with Score 19 to 23.
Internal match with Score 25 to 29.
Weak Match to Vector
(Expect 1 random match in 40 queries of length 350 kb.)
Terminal match with Score 16 to 18.
Internal match with Score 23 to 24.
Segment of Suspect Origin
Any segment of fewer than 50 bases between two vector matches or between a match and an end.


-------------------------------------------------------------------------------------------------------------------

출처: https://gist.github.com/brantfaircloth/4325589


local에서 직접 blastn으로 univec db에 돌려볼 경우에는 아래와 같이 option 값들을 설정하여 돌리면 가능

--> 실제 실행 결과 vecscreen을 사용한 결과와는 다르게 나타난다.

--> But, 실제 위의 vecscreen 페이지의 설명대로면 아래와 같이 옵션 설정되는 것이 틀린 것은 아님.

blastn -task blastn -db UniVec_core -query test.fsa \
    -evalue 1 -gapopen 3 -gapextend 3 -word_size 11 \
    -reward 1 -penalty -5 -out blast.out -num_threads 4 \
    -dust yes -searchsp 1750000000000 -soft_masking true \
    -outfmt 6


'Bioinformatics > New Tech' 카테고리의 다른 글

vector trim을 위한 NCBI vecscreen 서버에 설치하기  (0) 2014.01.23
BLAST local db setting  (0) 2014.01.20
GWAS? TCGA? ENCODE?  (0) 2013.11.01
Fold Change  (0) 2013.10.11
FastX toolkit local install  (0) 2013.09.09
Posted by halloRa
,

출처: http://www.biostars.org/p/69584/


Question: How to automatically screen thousands of sequences using VecScreen

I looked at the NCBI Vecscreen website (http://www.ncbi.nlm.nih.gov/VecScreen/VecScreen.html), and you can put multiple sequences in fasta format in at a time. It allows you to download results, but there are several blast "hits" in the results. The downloaded results are not in the same format as displayed on the website where the website indicates a section of the sequence that has strong, medium, etc. similarity to a vector. Is there a way to download the results? Particularly the sections of the sequences that are possibly contaminated.

I'm really looking for a way to automate screening hundreds of thousands of sequences for vector contamination (and then cutting the sequences to remove the contamination.)

Any help is appreciated.


1 answer

Okay, I got vecscreen to work. The problem was that the app wasn't included in the FTP files that I downloaded from NCBI. I used subversion to get all the code and was able to find and build vecscreen. The text output can be used to clean the sequences. This could be done with Python and BioPython.

Here is what I finally did to get vecscreen to compile. As I mentioned, for some reason it wasn't in the tarball from the FTP site, so I had to check out with subversion (svn) NCBI toolbox users manual for building: http://www.ncbi.nlm.nih.gov/books/NBK7167/

With Linux ... Make sure G++ is installed (could be different for different platforms), etc. Use the following command to get the source: svn co http://anonsvn.ncbi.nlm.nih.gov/repos/v1/trunk/c++ From the compilers directory, do ./GCC.sh (this is different for different platforms) This step could be unnecessary From the top-level directory of the checked out files, do ./configure --with-flat-makefile cd GCC444-Debug/build make -f Makefile.flat $PROJECT_NAME (i.e. app/vecscreen/) Also need app/blast/ and app/blastdb/ Downloaded UniVec_Core fasta file from ftp://ftp.ncbi.nih.gov/pub/UniVec/ (This has only non-mammalian vectors) Make local copy of UniVec_Core database in the GCC444-Debug/bin directory with the command: ./makeblastdb -in UniVec_Core -dbtype nucl -out UniVec_Core.db Use the vecscreen command (found in GCC444-Debug/bin/) ./vecscreen -db UniVec_Core.db -query $fasta_file -out $vecscreen_outfile -outfmt 0 -text_output


--------------------------------------------------------------------------------------------------------------------

실제 실행 ]


1. 서버 단에 svn 설치

> yum install svn


2. svn을 통하여 NCBI FTP로부터 파일을 다운로드

> svn co http://anonsvn.ncbi.nlm.nih.gov/repos/v1/trunk/c++


3. 해당하는 플랫폼 디렉토리로 들어가서 컴파일

> cd ./c++/compiler/unix

> ./GCC.sh


4. 다음 다시 top level directory로 돌아가서 아래와 같이 configure

> cd ../..

./configure --with-flat-makefile

 cd GCC444-Debug/build

make -f Makefile.flat ./app/vecscreen/


5. 다음 NCBI로부터 Univec_core 디비 설정 (http://hallora.tistory.com/304)


6. 마지막으로 실행

> cd ../GCC444-Debug/bin/

> ./vecscreen -db [path]/UniVec_core -query [fastafile] -out [output] -outfmt 0 -text_output


'Bioinformatics > New Tech' 카테고리의 다른 글

Vecscreen  (0) 2014.03.13
BLAST local db setting  (0) 2014.01.20
GWAS? TCGA? ENCODE?  (0) 2013.11.01
Fold Change  (0) 2013.10.11
FastX toolkit local install  (0) 2013.09.09
Posted by halloRa
,

출처: http://seqanswers.com/forums/showthread.php?t=9452


vector trim을 위한 vector search를 위해 UniVec_Core 정보에 

blast를 돌리기 위하여 UniVec_Core 정보를 db화하여 blast에서 참조할 수 있도록 해야 하는데

이 때


makeblastdb -in UniVec_Core -dbtype nucl -out UniVec_core


와 같이 작성해서 돌리면 끝!


이 때 dbtype은 protein 정보일 경우 prot 이라고 적어주면 된다.


'Bioinformatics > New Tech' 카테고리의 다른 글

Vecscreen  (0) 2014.03.13
vector trim을 위한 NCBI vecscreen 서버에 설치하기  (0) 2014.01.23
GWAS? TCGA? ENCODE?  (0) 2013.11.01
Fold Change  (0) 2013.10.11
FastX toolkit local install  (0) 2013.09.09
Posted by halloRa
,

> Rscript [myscript].R

'프로그래밍 > R' 카테고리의 다른 글

ensym() 에러  (0) 2024.04.15
factor to numeric & factor to integer  (0) 2012.05.16
Posted by halloRa
,